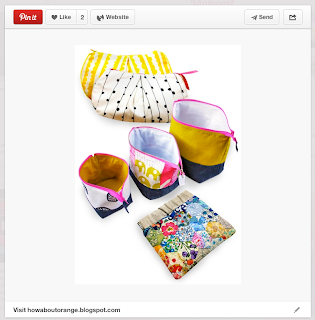
This was one of the first Pins that I repinned onto my very first board. It influenced my decision to begin this blog and to create one item a week from Pinterest. They were just so cute, I wanted to try them.
There are others on the same quest; taking Pins, trying them for themselves and publishing the results in their blog. So, I joined them. I sometimes need a little motivation to help me commit to creating new things. Otherwise, my days disappear into a blur of shopping, ironing, cleaning, driving the kids to and fro (sometimes I drive to school 4 times and back!) and the mundane nothing-ness that comes with plodding through the day until it's time to go to bed.
This Week's Pin: DIY Pouch Bag
Who's This For: To keep for a gift (when I need to give it)
Price: Zipper ($1.45 for 30 cm) + Fabric Scraps
This bag was made in one day, using fabric scraps and a purchased zipper and it's really gorgeous. The wide open mouth of the bag means you can see everything in it and the flat bottom stops it tippping over when you fill it and you can fill it with anything.
I used this gorgeous cotton drill left over from a big tote bag I made (like those Sportsgirl bags they've been selling for 30 years). I also cut sew-in interfacing and cotton lining.
The Pin led me to howaboutorange.blogspot which then gave me the link to http://www.noodle-head.com, the original creator of this gorgeous little bag. The bag I've made is using the 30 cm zipper and noodlehead.com gives exact measurements for a few different sizes of these bags. The seam allowance is 1 cm.
Here are the details converted into cms:
The instructions from noodle-head.com were very clear with really great photos. Following the instructions, I sewed the zipper onto one side of the bag, between the fabric and the lining. Yes, the first time, I sewed it inside out, but a quick unpick and onwards. To sew the zipper in neatly, I always sew the first 10 cms with the zip open, then remove fabric from machine, close zipper and continue sewing the rest of the seam. That way, I'm not struggling to sew around the zipper head.
It's important to make sure the end of the zipper (with the tab stop) is not sewn into the fabric. When you are about 3cm from the end, pull the zipper away from the seam. If you sew the zip in properly, the layers should be fabric, interfacing then lining.
Repeat for the other side ensuring that the zipper end is pulled away from the seam.
The next step is to stitch (with a 1cm seam) around the entire bag, leaving an opening in the bottom of the lining of about 8 cm. This is the hole for turning. Make sure you tuck the free end of the zipper into the inside of the bag as you sew around the outside.
While still inside out, flatten out the fabric at all four corners. Press open the seam allowance (I used my fingers) and measure the box width. Pin and stitch across the corners making sure it's square.
When you sew and trim the corners, it looks like a little 'box'.
Now, turn the fabric right sides out through the hole. Stitch the hole closed and press.
Cut a tab from fabric 5 cm x 7.5 cm and press the edges in about 1 cm.
Fold in half and pin over the end if the zipper. Stitch around the tab.
Topstitch around the bag opening 8mm.
The pouch has a very wide opening and zipped up, it's really cute.
My daughter keeps picking it up and reminding me how cute it looks. I think she's trying to come up with a reason for me to give it to her. So easy, I'll make more.
The newer version of the above pouch bag, has a contrast fabric on the bottom http://www.noodle-head.com/2012/06/open-wide-zippered-pouch-tutorial-size.html. I made one of those too.
You simply need to cut two pieces of fabric for the outside, sew them together and cut the interfacing and lining from one piece. Measurements are as follows:
Small Pouch cut top fabric 9 cm x 25 cm and bottom fabric 11 cm x 25 cm
Medium Pouch cut top fabric 11 cm x 30.5 cm and bottom fabric 14 cm x 30.5 cm
Large Pouch cut top fabric 14 cm x 35 cm and bottom fabric 16 cm x 35 cm
So, there you have it. Two gorgeous little bags, made from scraps and the cost of a zipper. I'd really like to line the next one with rip-stop, a waterproof lightweight fabric. Then it could be a toiletry bag.
Next week's the last week of Term. Hooray for that.
Soops
"Not all of us can do great things. But we can do small things with great love." - Mother Teresa


No comments :
Post a Comment