Thursday, 19 September 2013

End of Term Salted Caramel Mini-Cheesecakes

Term 3 has come to an end.  It's almost school holidays.  Term 3 in Australia can be a hard slog.  The flu season is still here and the kids come home from school with all sorts of wonderous illnesses at the end of a cold and wet Winter.  The holiday break can't come soon enough, I say.

It's my Sister-in-law's birthday and there's a family party so I'm making something sweet.


This Week's Pin:  Salted Caramel Mini-Cheesecakes
Who's This For:  My Sister-in-law's Party
Price:  around $23 (makes 24 small and 2 medium cheesecakes)


I've converted some of the recipe and here's the modified version:

Ingredients:
- 2 1/4 cups of Granita biscuits
- 3 tablespoons caster sugar
- 7 tablespoons salted butter, melted
- 910 gm cream cheese, softened
- 1 1/2 cups of caster sugar
- 3 tablespoons gluten free plain flour
- 4 large eggs
- 2 teaspoons vanilla extract
- 1/2 cup sour cream
- 1/2 cup whipping cream
- salted caramel sauce

As this is an American recipe, the ingredients ask for Graham Crackers.  I needed to do a little research about what exactly is a Graham Cracker and what is suitable as an alternative.  The general opinion is that the Granita biscuit is the closest biscuit.

The process is simple and the website is really easy to follow.  I baked the biscuit crumb mixture in the oven for 5 mins.

I whipped all the creams and cheeses with the sugar and eggs.


I topped up with the filling and baked for 20 minutes.  It's important not to overcook as they crack on the surface when they are overbaked.  No drama really, but they're supposed to be soft and mushy still in the middle.  I placed mine in the oven and kept an eye on the clock.  

I was then distracted by the telephone ringing twice and the doorbell had to be answered and when I ran back to the oven - oh no, I see cracks!

As I said earlier, no drama.  They'll still taste great.  The mixture was plentiful and I also filled 2 medium sized pans to keep for myself.  The original recipe asks to let the cheesecakes cool for an hour and serve with a spoonful of caramel sauce.  The cheesecakes sag a little in the middle as they cool and gives you a good place to fill with caramel.

I wanted to do them my way, so I used a tinned caramel sauce, the Nestle top-n-fill Caramel Sauce, as the last step and while the cheesecakes were still warm, I placed a dollop on to each and popped the trays under the grill for a couple of minutes.  When it began to bubble, I removed them and ta-dah!

They are not the prettiest - see original Pin image above, however I was looking for a slightly burnt, creme brulee looking top and I think that's what I got.  They were still soft and gooey in the centre and the Granita biscuits in the base were very wheat-y and moist.

Thank you for the kind words and feedback this Term.  See you in Term 4 for the downhill run to Christmas.

Soops

“Well, art is art, isn't it? Still, on the other hand, water is water! And east is east and west is west and if you take cranberries and stew them like applesauce they taste much more like prunes than rhubarb does. Now, uh... now you tell me what you know.”
Groucho Marx

Friday, 13 September 2013

Pouch Bag


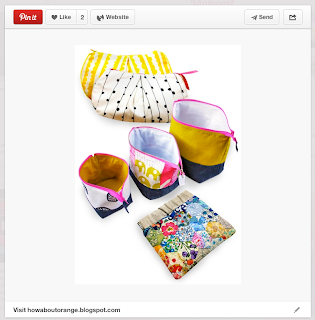
This was one of the first Pins that I repinned onto my very first board.  It influenced my decision to begin this blog and to create one item a week from Pinterest.  They were just so cute, I wanted to try them.

There are others on the same quest; taking Pins, trying them for themselves and publishing the results in their blog.  So, I joined them.  I sometimes need a little motivation to help me commit to creating new things.  Otherwise, my days disappear into a blur of shopping, ironing, cleaning, driving the kids to and fro (sometimes I drive to school 4 times and back!) and the mundane nothing-ness that comes with plodding through the day until it's time to go to bed.
This Week's Pin:  DIY Pouch Bag
Who's This For:  To keep for a gift (when I need to give it)
Price:  Zipper ($1.45 for 30 cm) + Fabric Scraps

This bag was made in one day, using fabric scraps and a purchased zipper and it's really gorgeous.  The wide open mouth of the bag means you can see everything in it and the flat bottom stops it tippping over when you fill it and you can fill it with anything.


I used this gorgeous cotton drill left over from a big tote bag I made (like those Sportsgirl bags they've been selling for 30 years).  I also cut sew-in interfacing and cotton lining.


The Pin led me to howaboutorange.blogspot which then gave me the link to  http://www.noodle-head.com, the original creator of this gorgeous little bag.  The bag I've made is using the 30 cm zipper and noodlehead.com gives exact measurements for a few different sizes of these bags.  The seam allowance is 1 cm.

Here are the details converted into cms:

The instructions from noodle-head.com were very clear with really great photos.  Following the instructions, I sewed the zipper onto one side of the bag, between the fabric and the lining.  Yes, the first time, I sewed it inside out, but a quick unpick and onwards.  To sew the zipper in neatly, I always sew the first 10 cms with the zip open, then remove fabric from machine, close zipper and continue sewing the rest of the seam.  That way, I'm not struggling to sew around the zipper head.


It's important to make sure the end of the zipper (with the tab stop) is not sewn into the fabric.  When you are about 3cm from the end, pull the zipper away from the seam.  If you sew the zip in properly, the layers should be fabric, interfacing then lining.


Repeat for the other side ensuring that the zipper end is pulled away from the seam.


The next step is to stitch (with a 1cm seam) around the entire bag, leaving an opening in the bottom of the lining of about 8 cm.  This is the hole for turning.  Make sure you tuck the free end of the zipper into the inside of the bag as you sew around the outside.


While still inside out, flatten out the fabric at all four corners.  Press open the seam allowance (I used my fingers) and measure the box width.  Pin and stitch across the corners making sure it's square.


When you sew and trim the corners, it looks like a little 'box'.


Now, turn the fabric right sides out through the hole.  Stitch the hole closed and press.


Cut a tab from fabric 5 cm x 7.5 cm and press the edges in about 1 cm.


Fold in half and pin over the end if the zipper.  Stitch around the tab.


Topstitch around the bag opening 8mm.


The pouch has a very wide opening and zipped up, it's really cute.


My daughter keeps picking it up and reminding me how cute it looks.  I think she's trying to come up with a reason for me to give it to her.  So easy, I'll make more.


The newer version of the above pouch bag, has a contrast fabric on the bottom http://www.noodle-head.com/2012/06/open-wide-zippered-pouch-tutorial-size.html.  I made one of those too.


You simply need to cut two pieces of fabric for the outside, sew them together and cut the interfacing and lining from one piece.  Measurements are as follows:

Small Pouch cut top fabric 9 cm x 25 cm and bottom fabric 11 cm x 25 cm
Medium Pouch cut top fabric 11 cm x 30.5 cm and bottom fabric 14 cm x 30.5 cm
Large Pouch cut top fabric 14 cm x 35 cm and bottom fabric 16 cm x 35 cm


So, there you have it.  Two gorgeous little bags, made from scraps and the cost of a zipper.  I'd really like to line the next one with rip-stop, a waterproof lightweight fabric.  Then it could be a toiletry bag.

Next week's the last week of Term.  Hooray for that.

Soops

"Not all of us can do great things.  But we can do small things with great love." - Mother Teresa 

Friday, 6 September 2013

Edible Glitter! Which version is better?


Wow, that edible glitter looks amazing!  I'm going to try that.


This Week's Pin:  Edible Glitter
Who's This For:  Me to use on any food that needs some sparkle
Price:  Bag of sugar

I saw this Pin and followed the link to planetpals.com.  I found edible glitter and clicked on the link http://www.planetpals.com/craft-non-toxic-craft-supply-recipes.html#glitter.  The recipe states 1/4 cup of salt (or granulated sugar).  Wait a minute, 1/4 cup of salt doesn't make it edible!  Can't say I'll be decorating my cake with the salt version.  Yes, it's non-toxic but I'll make the sugar version today thanks.


These are ingredients you'll find easily in your pantry, so this is something anyone can try at home.


I added 8 drops of liquid food colouring to 1/2 cup of caster sugar.  I didn't have granulated sugar on hand today.  I blended the colour in with the back of the spoon.


I spread it on a pan and baked for 10 minutes at 160 degrees celcius.


I also tried a coarser grain and used Low GI Cane Sugar.  This has the same texture as regular granulated sugar.  I added 4 drops to 1/4 cup of sugar and blended with the back of the spoon again.


When I took out the caster sugar, it had melted in one corner.  So I turned down the temperature to 150 and baked the Low GI sugar for 10 minutes.


When cooled, the caster sugar had lumps so I mashed again with the back of the spoon.

Low GI sugar before, above and after, below.


I noticed a better result with the coarser grains and I was hoping for a sparkling gold effect.  In comparison, obviously the finer texture of the caster sugar means it will melt faster.  The side-effect of the melted blue caster sugar was delicious, bright blue toffee shards - I could use this somehow some other time.
  

So, looking at the bags of sugars the baked version is on the left and the original sugar on the right.  The colour did clump a little in the baked version and gave little blue spots, but blended nicely in the original non-baked sample. Notice any 'glitter' yet?  Nope, me either.


I iced a vanilla cake and sprinkled the icing with three 'glitters' for comparison.  Left hand side is the baked 'glitter', top is the 'glitter' before it's baked and the right hand is a product that my mother sprinkled onto cupcakes when I was a little girl - Aeroplane Jelly Crystals.
Sorry, but I can't find any 'glitter' happening.  This is simply coloured sugar.  Which is great to use as it is, no baking, no fuss. In my opinion, a packet of Jelly Crystals at $1.09 a packet will sprinkle so easily onto anything and give a little sparkle but adds an extra element of taste.  Blue sugar tastes like sugar.

I'm not sure the image Pinned above is really edible glitter made from sugar.  This is a snapshot of the website image as it appears on the page.  If you've tried this with salt and got a better result, I'd love to hear about it.

Jelly Crystals will be used, as always, at my house.

Soops
"I have not failed.  I've just found 10,000 ways that won't work."   Thomas A. Edison