Friday, 1 November 2013

Gummy Bear Biscuits

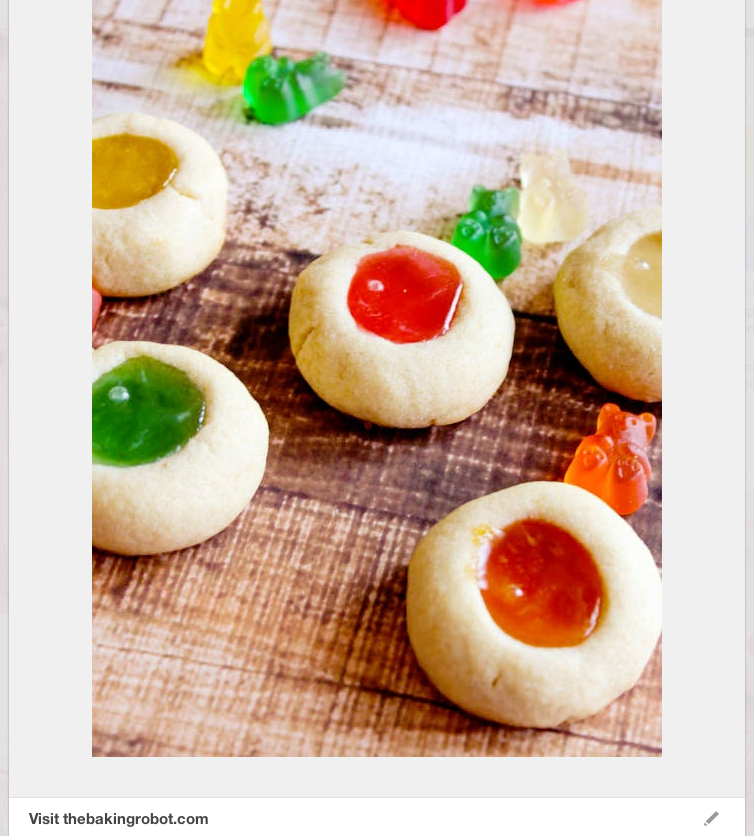
When I was young, my Mother often made jam drops.  I can't recall the last time I made them myself, but then I saw these interesting little gems.


This Week's Pin:  Gummy Bear Biscuits
Who's This For:  My Kids
Price:  $6.00 for 36 biscuits

I've seen recipes for biscuits where hard boiled lollies are melted on top.  The lollies give a sweet crispness to the top.  These gummy bears will give an unusual texture and I'm sure the kids will expect that these are jam drops - won't they be surprised?

Ingredients are simple:

1 cup unsalted butter
1/2 cup light brown sugar
2 egg yolks (I used 1 whole egg instead)
1 teaspoon vanilla extract
2 cups all-purpose flour
1/4 teaspoon salt
3 dozen gummy bears, plus extras for mindless eating while preparing


There's nothing new or difficult about this biscuit process.  I'm sure you've done this dozens of times before.  

Cream together butter and brown sugar. Add egg yolks, one at a time.  Stir in vanilla extra.
Mix in flour and salt, stirring until combined.  Wait a moment, all-purpose flour is not self-raising flour!  I need to use plain flour (this is what we call all-purpose flour in Australia).  Oops, I nearly made cake!

So, add the flour and don't overmix.

Cover the mixture and place in the freezer for ten minutes.  Preheat oven and line the baking trays with baking paper.  Sample gummy bears.


Scoop tablespoons of mixture and roll into balls.  Leave a couple of centimetres between the biscuits on the tray.  Press your thumb into the centre of the balls and place in the oven.


Notice I didn't add the gummy bears yet?  They'll only take a minute to melt so cook the biscuits for 8-10 minutes until they look pretty much done.  Remove the tray from the oven and place a gummy bear in the indentation.  Return the trays to the oven and cook for a further 2 minutes.

Don't walk away at this stage, or make a cup of tea, or answer the phone, because those lollies will be melted in the blink of an eye.

Let the biscuits cool and enjoy.

They're a chewy, buttery biscuit and yes, the gummy topping is not what you expect but the intensity of the fruit flavour is increased so they each have a different flavour - apple, orange, raspberry - yum.

I'm not completely in love with these biscuits.  The crumbly shortbread biscuit does exactly that - crumbles, when you are stretching the chewy gummy blobs.  But we liked them enough to polish them off in a couple of days.  I've got a tried and true biscuit recipe that I might add a different topping to next time.  Some of those great boiled sweets I have in the cupboard, yep.

Soops


"Imperfection is beauty, madness is genius and it's better to be absolutely ridiculous than absolutely boring."
  Marilyn Monroe

Friday, 25 October 2013

Finger Buns

Once a week I buy finger buns for my kids to have in their lunchboxes.  I found a couple of recipes to make my own and I found one to try.


This Week's Pin:  Finger Buns
Who's This For:  My Kids
Price:  $3.20 for 5

The website, frillsinthehills.com had a simple recipe with great photos to make these really appealing.  I followed the recipe but already noticed a few things that needing altering.

Here's my modified recipe:

475 g plain strong bread flour
75 g caster sugar
1 sachet of dried yeast
1 egg, lightly beaten
150 ml lukewarm milk
40g butter, cubed

So the technique is very simple.  Place the flour and the sugar in the mixer.  Don't forget to use a kneading attachment (shaped like a hook).

The original recipe was for 35g milk powder and 150ml lukewarm water.  I didn't have any milk powder so I used regular milk.   Bread recipes tend to be basic combinations of flour, water and yeast, but sweet breads and buns use milk instead of water.


Add the yeast to the lukewarm milk and stir.  Leave the milk a couple of minutes for the yeast to begin to activate.  This is usually left longer when you are making traditional dough however, I don't want the milk to get cold again.

Add milk to flour and egg and knead for 4 minutes.

Add the butter, spoonfuls at a time and continue to knead for a further 6 minutes.  The dough really struggled to incorporate the butter at this point.  Next time, I'd consider adding the butter with the milk as I think it would work better.


Nevertheless, I've got the dough ready.  As you can see, it's not as smooth as a bread dough but I'm hopeful the end product will be great.

I placed the dough in a greased pan and placed in my oven for an hour.  My oven has a defrost/rise dough function so I can leave it there and it'll do it's magic.


The dough didn't rise as well as it usually does.  Fresh out of the oven, they are brown, but dense and haven't risen.

OK, bin and try again.  This time, I can put my changes into action.


Place ingredients in bowl.  Add yeast to warm milk and rest.  Add butter with milk and eggs and mix.  Now that's a much better looking dough.


Out of the oven, and iced.  They look pretty good.  Taste?  Meh.  I'm looking for a bun that's super soft and fluffy.  Not like a cake but more like very light bread.  Sadly, I didn't get that.

So today's result is a 'Meh'.  Time for further research and try a different recipe next time.

Soops

“Try a thing you haven’t done three times. Once, to get over the fear of doing it. Twice, to learn how to do it. And a third time to figure out whether you like it or not.”
   Virgil Thomson

Saturday, 19 October 2013

Witch Shoe Buckles

Our school is performing 'The Wizard of Oz' next week.  I've volunteered to help with costumes.  So far I've made:

1. Kentucky Tie (like Colonel Sanders (KFC) wears)
2. 1 Cocktail Hat (to match the other 10 existing hats)
3. 11 Cummerband Sequin Sashes for the Poppy Dancers (you know, that part where Dorothy falls asleep in the flowers on her way to Emerald City).

The last thing I need to make is a pair of shoe buckles for that old Wicked Witch of the West.  I searched through Pinterest and couldn't find a Pin for making my own buckles.  There are plenty of costume companies that sell shoes with buckles, or buckles on their own but I've got 24 hours and need to make it myself.  Then I found this Pin.


This Week's Pin:  Witch Shoe Buckles
Who's This For:  The Witch in the School Musical
Price:  Zero - make it from what you have

The website, craftysisters-nc.blogspot explains the steps to create a fantastic with cake with shoes as the base with green buckles on the shoes.  

I'm only interested in the shoes but the variety of buckles shown was definitely food for thought.  The website doesn't have a template for me to use however, the shapes of the buckles below gave me ideas for my own.


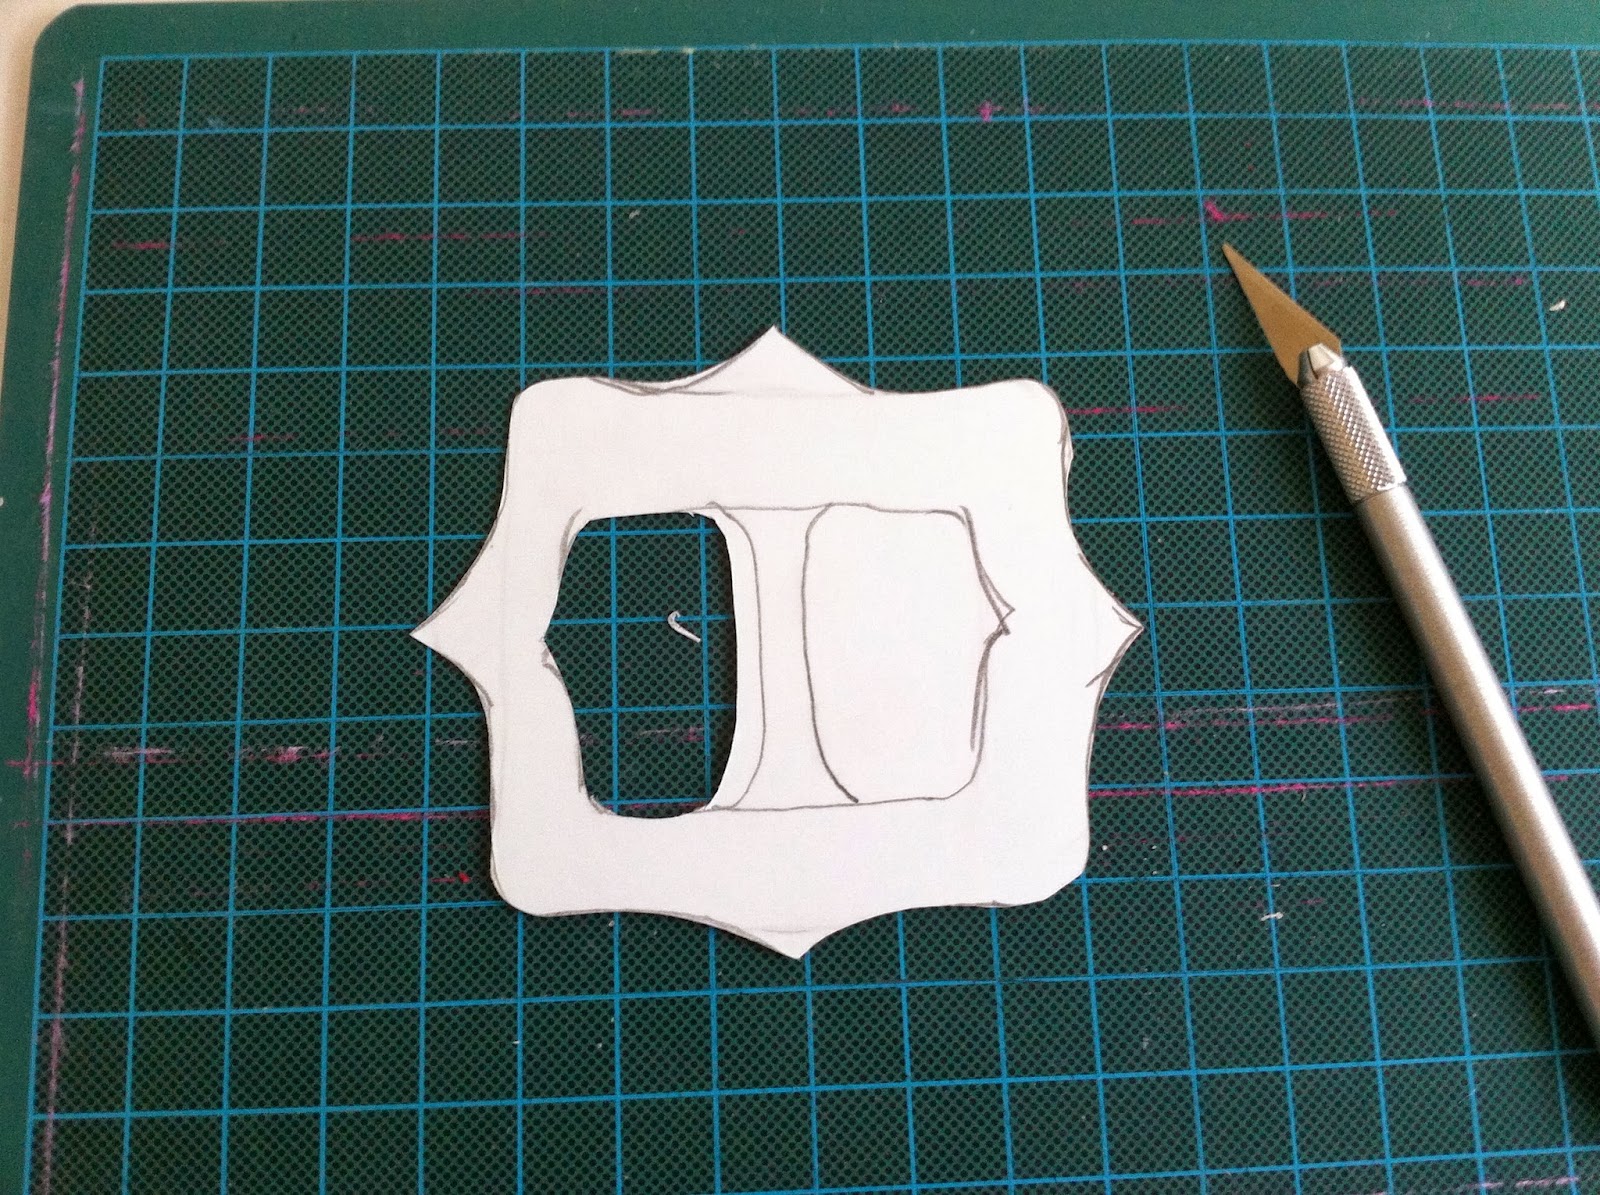
I used an old colouring-in book and removed the cardboard cover.  I sketched a buckle shape and cut it using a craft knife.

When it was done, I traced it to make an identical buckle.


Using PVA (wood) glue, I covered the buckles and then sprinkled with green glitter.  Use whatever you have - silver, gold leftover from Christmas.  You could even spray paint them if you have that on hand.


When dry, I covered in Mod Podge because I realised that Mod Podge will seal and glue and stiffen all in the one go!  I gave it another sprinkle with more green glitter.

I painted the back with silver paint and once the mod podge dried clear, I painted a fine line of silver around the top side of the buckle.  The mod podge transformed the texture of the buckle from cardboard to a soft, supple, latex feel, it bends but can hold it's shape and won't tear.
To wear the buckle over your shoe, simply make a loop of black elastic and thread it through the buckle and stitch.   Then, it simply slips over the end of your shoe and the elastic holds it tightly.

Well, I hope Witchy likes them and I think they'll stand out on stage.  Just what I was looking for.  Would I do anything differently next time?  Yes, I think the holes are too large, I'll make them more narrow next time.  Preparing for Halloween?  Make some for yourself.

Soops
"The moral of Snow White is never eat apples."
   Lemony Snicket


Wednesday, 9 October 2013

Halloween Makeup

My daughter received an invitation to a Halloween Party for the other night.
"But it's not Halloween yet," I puzzled.
"It's a few weeks early, I know, but won't it be fun?!" came the reply.

So, this week's Pin.


This Week's Pin:  Dia De Los Muertos Makeup
(Day of the Dead Makeup)
Who's This For:  My Un-dead Daughter
Price:  Under $10

In Australia, the majority of the population do not participate in Halloween, but my kids have always enjoyed it.  So, when the invitation came for a Halloween-themed party, we were all very excited at the thought of gruesome faces and tattered costumes.  My daughter decided to go as a 'Dead Fairy'.  I suggested we get inspiration from the Day of the Dead Pins.  The makeup has such ugly-pretty features that Tyra Banks would love.

I found this Pin, showing the 'map' of the details for the traditional Day of the Dead design. Dia de Los Muertos (day of the dead) is Nov 2 and is celebrated as All-Souls day by Catholics and originates in Latin America.


Fantastic! I can see the specific layout of the features I need to do.  But, my daughter doesn't want the bit at the top, the nose, the wiggles at the bottom, the swirls on the cheeks or the loveheart on the forehead.  Oh, so, um, it's not really Day of the Dead design is it?

Perhaps I can coax her for a little extra detail once we get started.

I bought white eyeshadow, silver eyeshadow and a cheap black kohl pencil from Priceline for under $10. I also had some black eyeshadow at home. 

I started with white eyeshadow all over her face.


Then I drew circles around her eyes and filled it in with black eyeshadow.  The black features of the Day of the Dead makeup is to replicate the hollows of a skull.  So you should have the point of the nose blackened, the eye sockets and the teeth accentuated in the jaw.


 She then asked for her eyes to 'dribble'.


 The lips were coloured with purple lipstick (you could do black) and outlined with black kohl pencil.


 I added the lines on the mouth to represent the skull teeth.


Her hair is long, so I tied it up in a bow.  Like to know how?  Take a look at the video here.


It turned out really well.  She wanted a very simplistic design and I couldn't convince her to add more detail, but I was liking it nonetheless.

The costume I made and she really loved it.  Everything was shredded and torn just the way my daughter imagined.  As for the fairy wings, I cut them out of cotton drill, sewed them together and then smothered them in mod podge (we all need a jar of that).  It gave the wings a leathery look with enough stiffness to stand up, but with a sag that a dead fairy would need.  


As Halloween is a few weeks away, we can replicate this and enjoy it again.  This time, I'm adding swirls and a big coloured flower just the way Dia de Los Muertos should be!

Soops

'Tis now the very witching time of night,
When churchyards yawn and hell itself breathes out 
 Contagion to this world.'            ~William Shakespeare

Thursday, 19 September 2013

End of Term Salted Caramel Mini-Cheesecakes

Term 3 has come to an end.  It's almost school holidays.  Term 3 in Australia can be a hard slog.  The flu season is still here and the kids come home from school with all sorts of wonderous illnesses at the end of a cold and wet Winter.  The holiday break can't come soon enough, I say.

It's my Sister-in-law's birthday and there's a family party so I'm making something sweet.


This Week's Pin:  Salted Caramel Mini-Cheesecakes
Who's This For:  My Sister-in-law's Party
Price:  around $23 (makes 24 small and 2 medium cheesecakes)


I've converted some of the recipe and here's the modified version:

Ingredients:
- 2 1/4 cups of Granita biscuits
- 3 tablespoons caster sugar
- 7 tablespoons salted butter, melted
- 910 gm cream cheese, softened
- 1 1/2 cups of caster sugar
- 3 tablespoons gluten free plain flour
- 4 large eggs
- 2 teaspoons vanilla extract
- 1/2 cup sour cream
- 1/2 cup whipping cream
- salted caramel sauce

As this is an American recipe, the ingredients ask for Graham Crackers.  I needed to do a little research about what exactly is a Graham Cracker and what is suitable as an alternative.  The general opinion is that the Granita biscuit is the closest biscuit.

The process is simple and the website is really easy to follow.  I baked the biscuit crumb mixture in the oven for 5 mins.

I whipped all the creams and cheeses with the sugar and eggs.


I topped up with the filling and baked for 20 minutes.  It's important not to overcook as they crack on the surface when they are overbaked.  No drama really, but they're supposed to be soft and mushy still in the middle.  I placed mine in the oven and kept an eye on the clock.  

I was then distracted by the telephone ringing twice and the doorbell had to be answered and when I ran back to the oven - oh no, I see cracks!

As I said earlier, no drama.  They'll still taste great.  The mixture was plentiful and I also filled 2 medium sized pans to keep for myself.  The original recipe asks to let the cheesecakes cool for an hour and serve with a spoonful of caramel sauce.  The cheesecakes sag a little in the middle as they cool and gives you a good place to fill with caramel.

I wanted to do them my way, so I used a tinned caramel sauce, the Nestle top-n-fill Caramel Sauce, as the last step and while the cheesecakes were still warm, I placed a dollop on to each and popped the trays under the grill for a couple of minutes.  When it began to bubble, I removed them and ta-dah!

They are not the prettiest - see original Pin image above, however I was looking for a slightly burnt, creme brulee looking top and I think that's what I got.  They were still soft and gooey in the centre and the Granita biscuits in the base were very wheat-y and moist.

Thank you for the kind words and feedback this Term.  See you in Term 4 for the downhill run to Christmas.

Soops

“Well, art is art, isn't it? Still, on the other hand, water is water! And east is east and west is west and if you take cranberries and stew them like applesauce they taste much more like prunes than rhubarb does. Now, uh... now you tell me what you know.”
Groucho Marx